This task is used to change the Utility Allowance for a community where only the Utility Allowance changes and all other rent plan values remain unchanged and overrides to Rent and/or Gross Potential will be respected. If you are changing the entire rent plan and not just the utility allowance, you should use the appropriate rent plan task.
The Rent Change Method is not Agency Controls Rent Change (Community Detail > Rent)
HUD and USDA funding programs require the Rent Change Method to be Agency Controls Rent Change and this setting should not be changed. Utility Allowance Change transactions are not valid transactions for these funding programs and will not be accepted if transmitted.
There is no Rent Plan effective for the date you want to make the Utility Allowance change. If there is, use the Maintain Selected Rent Plan - mm/dd/yy task to make your change.
Community Detail ![]()
![]() Rent Tab
Rent Tab ![]() Tasks
Tasks ![]() Add Utility Allowance Change
Add Utility Allowance Change
Effective Date: Enter the effective date of the new Utility Allowance Change or select it from the drop-down calendar.
If there is an existing rent plan with the same effective date , use the Maintain Selected Rent Plan - mm/dd/yy task to make your change.
Click Next.
The old Utility Allowance amounts will be next to the new Utility Allowance amounts along with +/- change between the two for your reference. All the Unit Classes are listed along with a count of units assigned to each.
When the Financial Rounding Method on the Community Detail > Program Info Tab is set to "Whole Dollars", you cannot enter Rent Plan amounts that contains pennies. You will receive an error message as soon as you tab out of any of the Rent Plan fields and again if you click Next to the Add Rent Plan step of the task before fixing your error.
Manually change the New Utility Allowance amounts for each Unit Class or
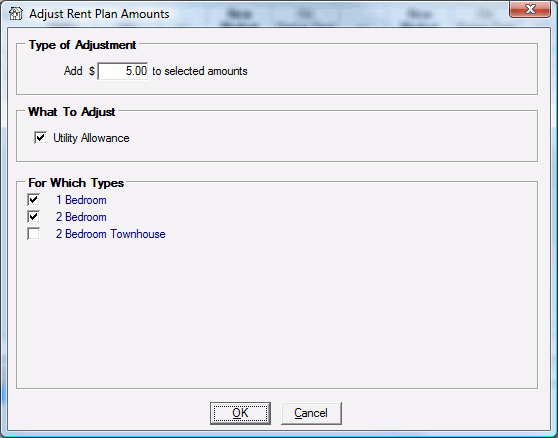
Click the Adjust Amounts link to adjust Utility Allowance amounts:
By a dollar amount.
You can select any, some or all of the Unit Classes to adjust.
Click Next.
On the left side of the screen there will be a list of units/households in the program group to be certified for the Utility Allowance Change with the effective date of the new Rent Plan. To exclude units from the certification uncheck the box in the Include column next to the unit.
Household's will only be listed here if the Rent Change Rules set at the Community Detail > Rent tab have the Utility Allowance Increase and/or Decrease set to Change on Date. If they are set to Change on Next Rent Change, the new UA will be certified when the next rent change occurs.
Click Next to create the Utility Allowance Change certifications for the selected units/households.
A pop-up box will appear asking "Update Utility Allowance for XX units?" Click OK to proceed, or click Cancel to go back to the unit selection screen to make changes.
An Overall Status window will pop up with a Passed or Failed message.
If it failed you may need to make a correction or contact Bostonpost Client Support at myMRI or contact a Client Support Analyst directly at (877) 579-8896 for assistance.
If it passed click Close.
Select any available documents you want to print by checking the box next to the document name.
You can also use the Select All and Deselect All links to help in making your selections.
Documents included in the "Gross Rent Change" Document Group (System Administration > Maintain Documents - Maintain Document Groups) will be included in the list of available documents.
Specify the number of copies you want for each document.
You can preview many of the documents in Microsoft Word, make changes, and print them within Microsoft Word by clicking the preview icon.
Click Finished.
A new Rent Plan Schedule will be listed with a check mark (![]() ) in the UA column to indicate that the only thing about the rent plan that changed was its Utility Allowance. All other values carry forward from the last rent plan unchanged.
) in the UA column to indicate that the only thing about the rent plan that changed was its Utility Allowance. All other values carry forward from the last rent plan unchanged.
If the units/households were certified, each will have a new UA - Utility Allowance Change certification on their Household Detail > Transactions tab.