Documents are a major part of Property Manager and help to limit the time you spend copying and sorting your paperwork for every day tasks like move-ins, move-outs, annual recertifications, lease renewals, evictions, payment batches, etc. Customizing and managing your documents allows you to keep the required paperwork up to date and prints automatically for the correct communities, funding programs, and households. There are hundreds of documents available to you in your Document Library (BP Standard Documents). These documents are standard templates that can be edited to your preferences or used as is. You can also upload your own documents to add to the Document Library.
You also have the ability to load PDF documents. When inserting a new document, just select PDF as the File Type. This gives you the ability to view and print PDF documents from any Print Option tab in Property Manager as you would with Word Merge documents.
For a listing of all available Merge Fields see the Document Name "Merge Fields for Documents" (just type the word Merge into the Name contains field and hit your [Enter] key). This document contains all the available Merge Fields organized by data source. You can use this document to copy Merge Field into any of your own documents.
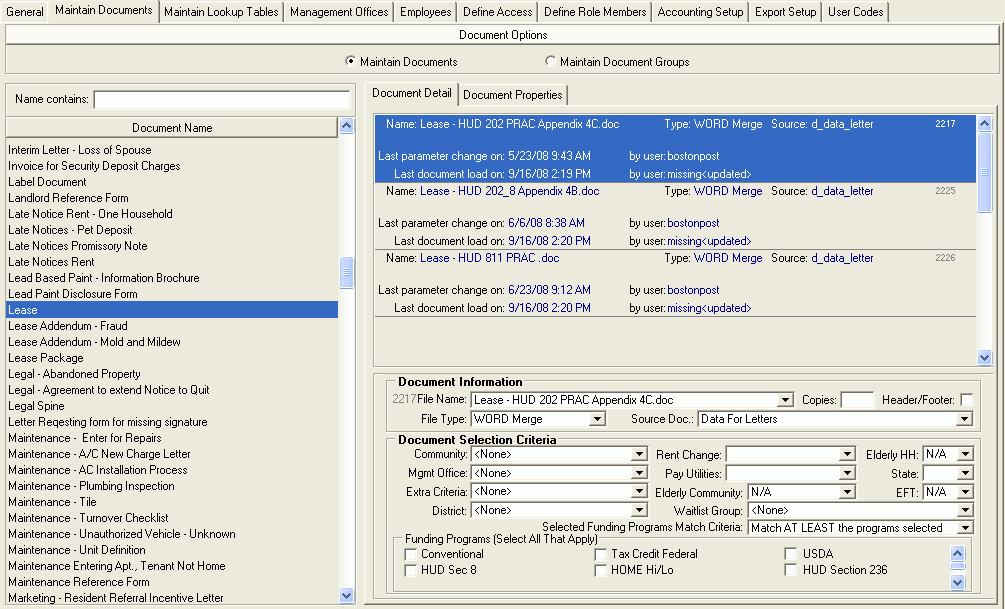
The Document Name data window contains a list of Master Documents. You can search for a Master Document by entering a document name or part of a document name in the "Name Contains" and hitting the [Enter] key. Each Master Document can contain one or more documents that will be used in applicable tasks based on the Document Selection Criteria. The Document Selection Criteria will define which Lease Document is printed for which community/funding program group. Each Master Document contains one or more Document. For example, the Master Document Leases will contain a Lease Document for each lease that is needed. You made need a different lease for Tax Credit, Section 8, HUD 202 PRAC, HUD 811 PRAC, Section 236, USDA, Market units, etc.
The Document Detail data window lists all documents setup for each Master Document; and the Document Information and Document Selection Criteria for each Document listed for the selected Master Document. The Document Properties data window allows you to edit the Master Document's name, description, any document link, reference type (if applicable), default number of copies to print, to print for all members of the household, to print for all adult members of the household, to print duplex, track for return, allow maintenance of the document and/or to utilize your printer's staple feature (if available). The Document Properties also allows you to select all the charge types to be included in the document, if applicable to the document.
Document Details
You can preview and edit a document by double-clicking the Document Name. This will open the Document in Word where you can make your necessary changes, and then saving it in Word will update the Document in Property Manager.
Insert Document - right-click and select Insert Document from within the Master Document that the new Document should be added.
Delete Document - right-click and select Delete Document after highlighting the Document you wish to delete.
Document Information
File Name - the Word file name for the document
Copies - enter the default # of copies to printed when the Document is selected to be printed
Header/Footer - select to include a header and/or footer on the Document.
File Type - Select Word Merge or StoredProcedure for Documents that contain Merge Fields.
The File Type “StoredProcedure” allows Bostonpost to add new merge fields for documents without a front-end release of Property Manager, meaning new merge fields will be made available between releases.
You can also select PDF as the File Type. This gives you the ability to view and print PDF documents from any Print Option tab in Property Manager as you would with Word Merge or StoredProcedure File Type documents.
Source Doc - Select a data source for where the merge fields pull data from.
Data Sources:
Data for Balance Items
Data for Bills
Data for Late Notices
Data for Lease
Data for Legal
Data for Letters
Data for Letters - Basic
Data for Letters - Basic Information
Data for Moveout Accounting
Data for Payment Batch Detail
Data for Payment Receipts
Data for Prospects
Data for Tenant Chargebacks
Data for Unit Inspections
Data for Verification Forms
Data for Waitlist Review
Data for Work Request
Merge Fields for Documents
Select the Master Document "Merge Fields for Documents to view the Merge Fields available for each of these data sources.
Depending on the type of document you are creating, you want to choose the correct merge field types. Most of your documents will use Merge Fields for Letters, which are the standard merge fields. However, late notice documents should contain Data for Late Notices and documents for the Waitlist Review Process should contain Merge Fields for Waitlist Review. Document Selection Criteria - allows you to specify what types of households should receive a specific document during the Print Options step of a task. If a Document Selection Criteria is set to <none>, that particular criteria will be ignored
IT IS VERY IMPORTANT THAT YOU ONLY USE MERGE FIELDS FROM ONE SOURCE PER DOCUMENT. In other words, if you copy and paste merges from Merge Fields for Letters in your document and then insert a merge field from Data for Late notices, some of your merge fields will not function correctly when you print. You will find that, no matter what source you choose to use, there are ample types of merge fields to utilize for your document.
Community - only print documents for households in a specific community.
Mgmt Office - only print documents for households in communities that are assigned to a specific Management Office (Community Detail > General Information tab)
Extra Criteria - only print documents for households that meet the selected Extra Criteria
Anyone in family has Social Security Income
Credit Balance
Has Voucher
Renewal
Vacancy
Zero Wage Income
Zero Wage Other Income
Zero Income
District - only print documents for households in communities in a specific District (Community Detail > General Information tab).
Under Eviction - only print documents for households that are under eviction.
Yes
No
N/A
Rent Change - only print documents for households whose rent went up or rent went down.
Pay Utilities - only print documents for households whose Community/Funding Program Group has one of the following (Community Detail > Rent tab)
Included in Rent
Not Included in Rent
Resident's Choice
Utility Allowance Provided
Elderly Community - Yes / No / N/A - only print documents for households in a community that is either an elderly community or not (Community Detail > General Information tab).
Elderly HH - Yes / No / N/A - only print documents for households that either elderly or not (Household Detail > Members tab).
State - only print documents for the selected state.
The document selection process for State will determine which state to use for a household in the following order:
State from the Unit Address the household is living in (Unit Detail > General tab).
State from the Unit Address the household is waiting for (Unit Detail > General tab).
State from any Community Address on any active waitlist (Community Detail > General Information tab).
State from the Prior Community Address where the household was a prior resident of that community (Community Detail > General Information tab).
State from the Household Mailing Address where the household has not lived in any community in your database (Occupancy and Compliance Detail > Prospects tab - Add Prospect and Update Guest Card tasks
EFT - Yes / No / N/A - only print documents for households that either pay their rent by EFT or not (Household Detail > General tab).
For example, you may not want to print Rental Coupons for households who pay their rent by EFT.
Waitlist Group - only print documents for households that are in a specific Waitlist Group.
Select Funding Programs Matching Criteria
Match the program selected Exactly - can only select one funding program - only print documents for households in a specific Funding Program.
Match AT LEAST the programs selected - Property Manager will do the following when trying to determine which document to print:
The documents are put in a specific order based on the selection criteria that is used. If the selection criteria options are the same, order is based on the name of the document.
The process you are in will go through the list of documents, checking the status of the community, unit, household and member against each document to check for a violation of the selection criteria. If there is a violation, Property Manager will skip to the next document.
With regards to the Funding Program document options, Property Manager does not require a perfect match. If the system finds a perfect match, it will use that document and stop searching. If Property Manager finds a document that has one or more of the Funding Program's selected and those Funding Program's are all part of the group the unit is counted in but is not the complete list of Funding Program's for the unit, Property Manager will consider that a close match and not a violation. If Property Manager finds a close match, it will continue to search the list looking for a perfect match. If Property Manager fails to find a perfect match it will go back to the first close match it found and use that document.
Match ANY ONE of the document program selected - will print documents if the household is in any one of the Funding Programs selected.
Funding Programs - select all that apply. Works in conjunction with the Funding Programs Matching Criteria above.

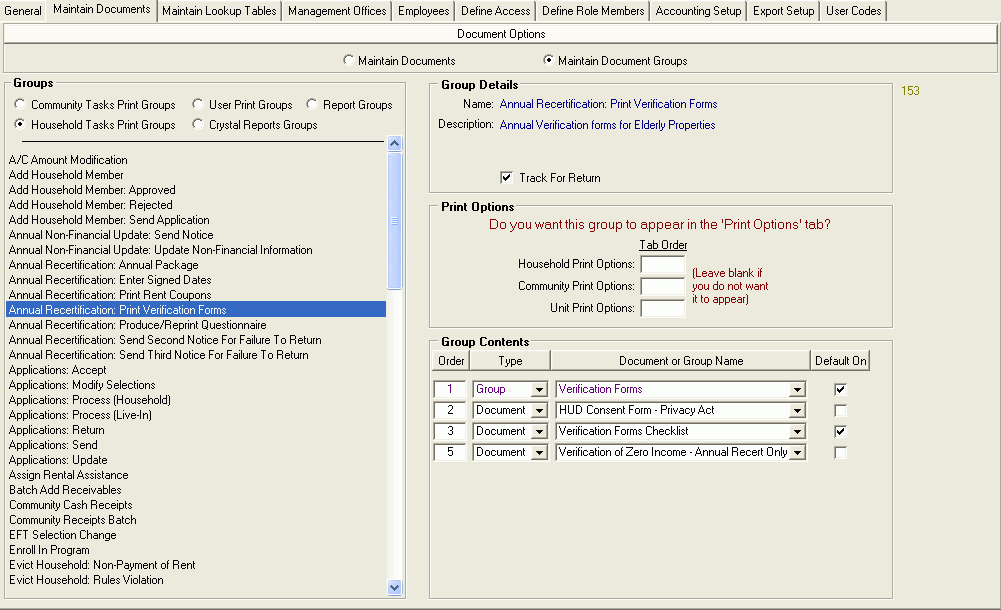
Select Maintain Document Groups under Document Options to change the view. If you need to add or create a new Master Document, make sure it is added to the appropriate Document Groups. Print Groups allow you to locate tasks at the Community and Household levels of Property Manager and determine which documents print when those tasks are completed. The Groups data window is a list of all tasks in Property Manager that have a Print Options step at the end of the task. When you select a task, the Group Details, Print Options and Group Contents data windows will display the details for that Print Group.
Group Details - Select to Track documents in the Print Group for its return
Print Options - Do you want this Group to appear in the "Print Options" Tab?
Enter a Tab Order to include the Documents in this Print Group on the Community Detail, Household Detail or Unit Detail > Print Options tabs, in addition to the tasks they are to be included in.
Group Contents - Include as many Documents or Document Groups to include in the Print Options step of the task.
If you select another Document Group, all of the Documents in that Document Group will be included in the task.
Default On - if selected, the document will default to being selected on the Print Options step of task.
To Insert or Delete a Document from a Document Group, right-click from within the Group Contents data window and select the appropriate action from the right-click menu.
