We are pleased to announce the latest release of Property Manager version 7.1! There are a number of changes that have been made to Property Manager and this document will highlight each of them. There is a summary listing available as well. When you are prompted to download the upgrade, it is possible that you will receive the following warning:
![]()
Click the warning and choose "Install" to update your ActiveX control and then you can continue with the upgrade.
To queue Industry Interface files to MINCS using version 7.1.15 or version 7.1.16, use the menu option Occupancy and Compliance Detail / Industry Interface / Queue USDA RD Files. Select the appropriate files and click Upload. In version 7.1.17 the Queue button will be available again from the Build USDA RD Transmission Files wizard.
Ability to sort households by unit or name in drop down list added.
Expired billing notes moved to General Tab and will be removed automatically when corrected.
Ability to add notes applying credits or refunding credits added.
Special claims for damages or unpaid rent no longer force a write off of balance.
Link to rent plan counts added to rent tab at community view.
Change non certified recurring charges for all households at once regardless of funding program.
HAP Payments can no longer be received using the batch type "Non-Hap".
Ability to separate principal and interest amounts for mortgage deductions on HAP payments added.
Ability to refund monthly utility reimbursements by printing checks from Disbursements Tab added.
Ability to print community cash receipt batch reports added.
Ability to define excess income G/L accounts for subsidy receivable type.
User Codes now available to define and use for households, units, and communities.
Auto-process GL export method added for customers who do not export data.
Ability to store favorite reports in a custom folder for your database added.
Ability to delete Miscellaneous Adjustments from your HAP if they were denied added.
You will no longer be able to reject a HAP that you have received payment for already.
The queue and requeue HAP tasks have been combined into one task.
For USDA households with rental assistance, the move out date cannot be on the 1st of the month.
Support for handling rent calculations on mixed HUD subsidy type communities added.
For Public Housing communities, the Earned Income Disallowance calculations are now implemented.
For Public Housing communities, the Moving to Work 50058 is now available.
For all funding programs, the passbook rate defaults are now maintained by Bostonpost.
A new search icon (magnifying glass) ![]() appears to the left of Community field in the context bar that brings up a context sensitive finder. If you are looking at the Community Detail View and click the magnifying glass, a new finder opens with search criteria for a Community. Similarly, if you are in the Unit Detail View, the same icon will provide search criteria for a Unit. From the Household Detail View, this same icon produces the standard Person Finder that you get when clicking the binoculars.
appears to the left of Community field in the context bar that brings up a context sensitive finder. If you are looking at the Community Detail View and click the magnifying glass, a new finder opens with search criteria for a Community. Similarly, if you are in the Unit Detail View, the same icon will provide search criteria for a Unit. From the Household Detail View, this same icon produces the standard Person Finder that you get when clicking the binoculars.
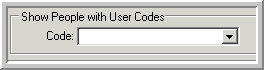
Each of these finders also has a section for searching by User Codes. If you have made use of User Codes (see System Administration / User Codes) you can now search for a Household, Community, or Unit that has a user code value that matches your search value. For example, you might store license plate as a Household user code. Then you can find a household in Property Manager by entering in the license plate number.
In the Household list from the context bar, you will now see pending households in vacant units where a household has been scheduled. Pending households show in red with their scheduled movein date. When you navigate to a pending household from the Person Finder, the household’s pending community and unit will show in the context bar and all other households for the community will be available in the household context list. To the right of the Household list is a Sort option button that allows you to sort the list of Households by Unit or by Last Name.
![]()
Schedule Move In / Schedule Transfer: Both of these tasks have been modified. The first tab will prompt you for the move in date only - then a second tab will present a list of units for each waitlist row based on the move in date. That list will show you the apartment number, unit class, handicap status, out date for current or former tenant, maintenance ready date if available, current tenant, and pending tenant information. There was a list of unit numbers only with no additional information prior to this release.
If a household is billing based on a certification that is more than a year old, our system notifies the user that a renewal is due with the message 'Billing Schedule for Rent Expired 7/31/2006 - Extended Billing for 8/31/2006’. Depending on the funding program governing the unit, the billing will be extended based on prior year amounts for 3 months (HUD, USDA) or indefinitely. When this note appears on the Household General Tab, it is time to update the household with a new AR transaction to advance the Next Recert Date. Then the note will no longer appear. This notification was originally implemented as Financial Warnings on the household Notes Tab, but in release 7.1 the notification will be on the Active/Notes section of the General Tab.
The Refund Credits task will now allow you to type notes for the Event History. The Apply Credits task will also now allow you to type notes for the Event History. If credits are being applied from receivable balances at one community to another, a warning will display ”You are about to apply a credit to a charge for this household under a different community. This will create Due To/From GL Entries to move credit from one community to another. Are you sure you want to apply the credits?"
Convert Subsidy Due to Promissory Note: When income has been misreported to the agency causing the tenant to have received too much subsidy, use this task when the amount must be collected from the tenant and paid back to the agency. This task creates adjustments to remove the rent receivables from the tenant’s outstanding balance and create a separate promissory note with its own payment schedule for the tenant to pay back the total amount. This wizard has changed to allow you to select the subsidy credits that will be paid to the agency when money is collected and select the receivables (Rent or Utility reimbursement) that will be cleared for the tenant. The selected amounts of subsidy must equal the selected amounts of tenant receivables.
Transfer Receivables to Promissory Note: Use this task if a tenant has an outstanding balance due to the Property Management company and you wish to clear the tenant receivables and create a Promissory Note balance with a new payment schedule. In release 7.1, this task now requires that all receivables selected be from the same unit. This prevents accounting from crossing between communities and provides better tracking of the charges still due from the tenant by assigning the unit to the promissory note.
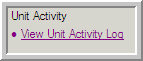
In the Unit Detail, on the General Tab, a new task has been added. The Task "View Unit Activity Log" allows you to see all the system activity that has happened for a unit. Although there are a lot of internal codes that our support team uses to help diagnose a problem, you may find this task to be a useful audit trail of the date and time when a unit was modified and by whom. This is generated by the same audit log that is used for the Household Task ”View Household Activity Log”.
A unit can be placed in Offline status to indicate it is not currently an income-earning unit. It must be vacant and will not bill accounting for vacancy or gross potential during the period while it is offline. To place a unit offline, from the Unit View / General Tab choose the Take Unit Offline task. Enter an effective date for the change, the offline status, check the confirmation box and click Finished. The unit will no longer generate accounting entries to vacancy or gross potential as of that date.
There are two ways to place a unit online:
Choose a unit in offline status and on the Unit View / General Tab choose the Place Unit Online task. Enter the effective date of the change and establish the rent, utility allowance and gross potential in effect as of that date. If this date is in the past, billing adjustments to vacancy and gross potential will be generated to catch up to the present billing cycle.
Schedule a Move-in to a vacant unit that is offline. This will automatically change the status to online as of the move-in date. By default, the Unit Rent will be established from the rent plan in effect as of the move-in date.
You can define custom reasons for a unit to be offline under System Administration / Maintain Lookup Tables / Unit Offline Status. Bostonpost provides one default status that is used during conversions and when units are added to an existing community. The offline status may be used for units not ready for occupancy at a new property under construction. If there was a fire in a unit that makes it uninhabitable, the unit could go offline for a period of time. If new units are added on to an existing occupied property, the new units should start as offline and become online when you want to count them as income earning whether vacant or occupied. If a unit is offline, the Offline Status will show on the Unit View / Compliance/Rent / Transaction History on the right hand side of the Transaction History.
Unpaid Rent / Damages
The wizard has changed to make the Write Off step the last step and it is now optional. You are not required to write off the outstanding amounts in order to produce the Special Claim forms.
Vacancy Claims
Validation has been added to prevent invalid claims from being created and the wizard gives explanations for why vacancy claim cannot be added. Examples are:
Previous tenant has open deposits.
There is no unit ready date. You can go to Unit Turnovers and populate the Maintenance End Date.
The claim period has not ended. The unit must be vacant for 60 days or a transmitted move-in cert must exist.
The period between the Unit Ready Date and the In Date is less than or equal to one day.
You may not file a form for this type of program.
On the Waitlist tab, the list of applicants can now be sorted with two options:
Transfers/Application Date: Transfers first (that is, current residents waiting for a different unit) and then all households are sorted by application date. This was the only sort for this list in prior releases.
Program Group Waitlist Sort: This is a customized sort order that is already used to sort the list of possible applicants on the Manage Vacancies tab. This sort order can be defined on the Community View / Program Info tab under Program Group Detail. The possible sort criteria include Transfer, Application Date, Income, Age Group, Waitlist Preference and Household Size. For example, if you want to sort the waitlist first by Waitlist Preference then by Application date, put a 1 next to Waitlist Preference and a 2 next to Application date and leave the other criteria blank.
Waitlist Review tasks are now available from the Waitlist Tab task list. When you use the task to print notices, each waitlist entry is stored with a status reflecting that the first or second notice has been sent. To see the Waitlist Notice status on a household, go to the Household View / Waitlist Tab and review the activity at the bottom of the window. If you have a printing problem, there are now two new tasks - Reprint First Notice and Reprint Second Notice which allow you to reprint the documents without advancing the mailing date. If a notice is reprinted with a new mailing date, the waitlist activity on the Household View / Waitlist Tab will be updated accordingly.
We have added links to the counts in the rent plan section. If you double click on the underlined numbers in the column for Count or Below Plan, you can view a list window to see which households and units are based on that rent plan.
Change Non-certified Schedules: this task now allows you to change the recurring amount of a charge type for all units in the community at once – it does not require you to update them separately by funding program group. This task can be used if you have air conditioning charges in all or most units and you need to increase the standard charge from one amount to a new amount. You enter the charge type and new amount on the first tab, and you can select which units to include to update the scheduled amount on the second tab.
Using Payment Batch Types related to subsidy:
Subsidy - USDA
Use this batch type to process Rental Assistance subsidy received from USDA. This payment batch type continues to work the same is it has in prior releases.
Subsidy - Non HAP
This payment batch type is meant to handle sources of subsidy that are not reported to an agency via transmission through Property Manager. Use this payment batch type for outside vouchers, that is, subsidy issued to the household and not project-based. With Release 7.1, subsidy receivables requested on a HAP will NOT be available to be paid in a Non-HAP payment batch. Any HAP related subsidy on contracts that are submitted through TRACS must be processed with a payment batch of type ”HAP Request” (see details below). On the Payment Batch Detail tab, when you select an outside voucher subsidy source such as ”Local Housing Authority Voucher”, only subsidy receivables that match the voucher source will be listed to be included in the payment. The voucher source is billed based on the transaction defined for the household on the Household View / Transaction Tab. The voucher information on the transaction for a household is created from the Household View via the Move In, Annual Recertification, or Add New/Modify Existing Voucher tasks. To confirm that the billing schedule information and open items are correct for the household, you can view them on the Household View / Accounting Tab / Subsidy Tab. It is important to keep the voucher sources defined correctly at the household level and apply the payments to the correct receivables because reports and accounting will track the outstanding receivables by voucher source.
Subsidy - HAP Request
This payment batch type allows you to process a HUD subsidy payment based on the last transmitted HAP request. On the Payment Batch Detail tab, the field labeled ”Subsidy Received (Owed)” will default to the total amount of subsidy requested on the HAP. The subsidy receivables included on the HAP will automatically be selected in the payment batch so that there should be no reconciliation required between the subsidy amount received from the agency and Property Manager. The Subsidy Received (Owed) field should always hold the gross subsidy receivable defaulted from the HAP request. If the default Subsidy Received (Owed) amount does not equal the amount approved from the agency, you need to correct the HAP Request in Property Manager to update the subsidy receivables to match. This is necessary for Property Manager to create correct adjustments for the HAP request in the following month. Four new fields have been added for those customers who choose to account for their mortgage payment as part of their subsidy payment in Property Manager. These new fields are not required and if left at 0.00, the processing will continue as in prior releases. For those customers who choose to record their mortgage payment as part of their subsidy payment in Property Manager, enter a negative amount in the Loan Payment (Owed), and Property Manager will compute the Net Received (Owed) amount. In Release 7.1 you can also separate the Loan Payment Owed into Principal and Interest components by entering the Interest Owed (as a negative number). When the payment batch is processed, Property Manager will use the GL accounts defined for Agency Payable Holdback and Agency Payable Interest as defined under System Administration / Accounting Setup / Charge Type setup.
• Credit Subsidy Receivable for the Subsidy Received amount
• Debit the Agency Payable Holdback liability account for the Principal (Owed) amount
• Debit the Agency Payable Interest expense account for the Interest Payment (Owed) amount
• Debit Cash for the Net Received (Owed) amount
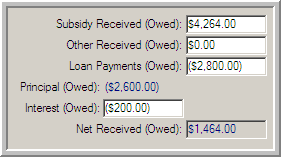
Also new with Release 7.1, this process allows the Loan Payment Owed to exceed the gross Subsidy Received. In this case the Net Amount is a negative number, meaning more is owed to the agency than was received as gross subsidy receivable, and the resulting adjustment to Cash would be a Credit.
There are now four ways you can refund a monthly utility reimbursement to a tenant.
Individual Household: This will clear the open item and generate GL entries to credit the Refund account defined on the Utility Reimbursement charge type and debit the tenant Receivable account. From the Household Detail View/Accounting Tab/Receivables Tab, choose the open credit item and select the Refund Selected Receivable task.
Multiple households at a community or All Authorized Communities: This will process all households with a utility reimbursement open item in the community or communities selected. The accounting is the same as in method #1. From the Accounting View/General Tab choose Refund Utility Reimbursements task and enter the effective date of the refund. Click Next to generate the utility reimbursement report.
Nightly cycle: An automated process can be scheduled in our nightly batch cycle to refund outstanding utility reimbursement credits at all communities daily (when they are created) or on a particular day of the month. This method is used to automate the process instead of selecting each household individually or having to remember to do the process each month. The accounting generated is the same as in method #1. Contact Bostonpost if you wish to set up this automated cycle.
*New* The Disbursement tab from Accounting View: This interface will print the checks on your local printer at the same time it clears the open item from the household. GL Entries are created to debit the tenant receivable and credit the Cash account. When the GL batch is processed via Accounting View/General Ledger/Process GL Batch, the Quickbooks interface will also transmit a ”check” record with check number information so you will be able to reconcile the cash transaction in QuickBooks. All other export types will include the GL entries to Receivables and Cash, but the cash account activity will not be identified as a check when reconciling accounts in the GL software.
The following items must be setup prior to using the new task:
Bank account information must be set up in System Administration View / Maintain Lookup Tables / Bank Accounts. Here you define the fields to use for the automated printing process: the bank name and address, routing information, check stock and last check number. The disbursement process will start with a check number one greater than the last check number entered for the bank account and will update the last check number used at the end of the printed check batch.
The Cash Account must be defined for the Utility Reimbursement Charge Type. This can be done for all communities using System Administration/ Accounting Setup/ Charge Type Setup or at the community/funding program group level using Accounting View/Account Maintenance.
In order to use blank stock for checks, be sure you print checks from a computer with the MICR font installed in order to print the MICR line with bank routing and account numbers.
For help using the new task, click here: Create Utility Reimbursement Refund Checks. Please note that this task is available for Quickbooks users only.
On the Disbursement tab, you can view a history of all batches created and filter the list by creation date range. The batch summary and batch detail are displayed. There is a corresponding GL batch for the GL entries created for this disbursement that still must be processed on the Accounting View/General Ledger Tab. For reconciliation, a new report was created called the Utility Reimbursement Check Register report to display checks created for one or all communities for a date range.
At the end of the wizard to Add Cash Receipts a Print Options tab has been added. By default the report defined for this wizard is the Batch Deposit Summary by Community. You can maintain this print group using through system administration. You can also reprint the reports after you complete the wizard. On the Accounting View / Community Receipts Tab, select a Cash Receipts batch and choose the task Print Batch Reports to print the same report(s) that are available at the end of the Add Cash Receipts wizard. You can also use this feature from the payment tab when viewing batch history. From the Accounting View / Payment Tab / Batch History view, choose the Task "Print Batch History Reports."
Excess rent
Excess rent income is created any time the rent plus subsidy billed exceeds the defined gross potential for a unit. Some funding programs (USDA 515 and HUD 236) generally require the overage collected to be remitted to them. Other situations allow the excess income to remain with the property.
Setup options
Excess income must be mapped to a general ledger account and this has already been done on the System Administration / Accounting Setup / Charge Type Setup screen within the Tenant Rent Charge Type. It could only be mapped to one account, even if some came from the tenant and some came from another source (i.e. Voucher). Beginning in Release 7.1, the income can be mapped to two different accounts; excess income, tenant and excess income, subsidy. The accounts DO NOT have to be different but they do have to be defined in an additional place. Beginning with 7.1, excess rent must be defined on the Charge Type Setup screen within the Subsidy Charge Type as well. Excess Rent can also be customized for each Voucher Source through System Administration / Maintain Lookup Tables in the Voucher Table.
Note: The conversion will assume that the subsidy excess rent account is the same as the tenant rent excess rent account and populate that field accordingly.
Processing Logic
Excess rent is assumed to come from the tenant portion first (see example A). If there is insufficient tenant contribution to account for all of the excess rent, the balance will come from the subsidy portion (see example B).
|
Example A: Gross Potential (Basic Rent) = $500 |
|
|
|
Tenant pays $100, Outside Voucher pays $430 |
|
|
|
The billing entry will: |
|
|
|
Debit Tenant Receivable |
$100 |
|
|
Credit Rent Gross Potential |
|
$70 |
|
Credit Rent Excess Rent |
|
$30 |
|
Debit Subsidy Receivable |
$430 |
|
|
Credit Subsidy Gross Potential |
|
$430 |
|
Example B: Gross Potential (Basic Rent) = $500 |
|
|
|
Tenant pays $10, Outside Voucher pays $520 |
|
|
|
The billing entry will: |
|
|
|
Debit Tenant Receivable |
$10 |
|
|
Credit Rent Excess Rent |
|
$10 |
|
Debit Subsidy Receivable |
$520 |
|
|
Credit Subsidy Gross Potential |
|
$500 |
|
Credit Subsidy Excess Rent |
|
$20 |
Loss to Lease
Loss to lease is the opposite of Excess Rent. This is the expense account that is adjusted in the billing cycle when the tenant receivable and subsidy receivable do not add up to the defined gross potential for the unit. This can occur for several expected reasons: A household obtains an outside voucher that, when added to the tenant portion, does not pay the entire rent or an agency determines a new approved rent for the unit, but the existing outside voucher is still in effect for several months. The expected income (Gross Potential) can be raised based on certifying a new rent plan as of a certain date but the existing tenant may not be charged the increased rent until a future date because of terms in the lease or a tax credit unit may have rent restricted by the maximum allowable tax credit rent that may be lower than the expected rental income on the unit.
Several updates have been done for this process. You can add user codes to your database to track any item that you need - such as parking spots, car types, license plates, associations, memberships, or any other trackable detail. These codes can be assigned to households, units, or communities. The User Codes tab within the System Administration Detail is where you add and set up the codes that you would like available for selection at the unit, community or household level. You can now search for user codes in the finder window - by using the new field available. For additional information regarding user codes click here: User Codes
Export Information Setup
There is a new export type called "Auto Process" for customers who currently use the ”No Export” setting. This export type is an alternative option for customers who do not create an interface file to a GL Software package or interface directly as with QuickBooks or BP Financials. When Auto Process is selected for a community, the nightly batch process will clear all pending GL activity and create processed batches automatically. When there is a difference in event month and year, separate batches will be created ensuring that backdated activity will be in separate batches. By using "Auto Process", GL Report Date will be a fixed date equal to the latter of the effective date or the date the event was entered in the system. Month end reports run using the "GL Report Date" criteria will not change no matter when they are run. This updates the data as if customers not interfacing to GL created their batches daily instead of periodically. With this export type in place, using the Accounting View/General Ledger Tab/Pending GL Batches option will display activity for only the current work day. Viewing Processed GL Batches will show activity previously batched by day.
![]()
![]()
![]()
![]()
![]()
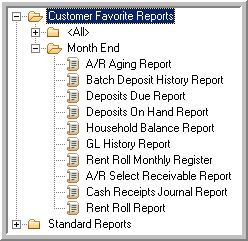
A new folder is available for your company to store Favorite Reports. Users with security permission will be allowed to create sub-folders under Favorite Reports. They will also be allowed to pick which of our standard reports they want to appear under their custom sub-folders. These folders will be available to all users of your database. A task list is now available on the report view with a new task called Manage Custom Report Groups. From here you can add sub-folders with a sort order and select reports for each sub-folder with a preferred sort order. A description for each report is now displayed on the right side of the view when the report is selected from the list.
Pending Activity - If you are authorized to view a community, you can now view any pending activity (Move-in, Move-out, Transfers) at this community. In prior releases, only the assigned Rental Agent to this community could view the activity. Appropriate tasks appear in the task list if you have security access to complete this activity.
Awaiting Approval - If you have access to process Supervisor Approval requests that display in the Awaiting Approval section of the window, each row has a field to change the Approval Status from Requested to Rejected or Approved.
Special Claim sub-tab
You can now enter two different Claim IDs for the Unpaid Rent and Damage claims in the wizard to log receipt of a special claim.
Miscellaneous Adjustments sub-tab
You can add or delete Miscellaneous Adjustments to your HAP Voucher on this tab. In order to process your HAP voucher payments, it is important to make sure the HAP voucher in Property Manager matches the HAP Voucher as your Contract Administrator will process it. We have added two new tasks to help with this.
Add Selected Item and Modify Voucher Amounts: If you select a Miscellaneous Adjustment that is not already included in a HAP, this task will appear. If the CA will add this adjustment to your HAP and does not require you to retransmit the HAP you should use this task to modify your transmitted HAP. You can only modify the most recently transmitted HAP. This task will modify the printable voucher forms, but the MAT file you created and transmitted will not be changed. If the CA requires that you retransmit the HAP including the Miscellaneous adjustment, you need to select the task to Rebuild TRACS Files in Selected Item and recreate the forms and MAT file.
Delete Selected Item and Modify Voucher Amounts: If you select a Miscellaneous Adjustment that was included on a HAP but will not be approved by the CA and the CA does not require you to retransmit the HAP use this task to remove the adjustment from the HAP. If the CA requires that you retransmit the HAP including the Miscellaneous adjustment, you need to select the task to Rebuild TRACS Files in Selected Item and recreate the forms and MAT file.
HAP Request sub-tab
Requeueing a TRACS file that has already been transmitted is now combined with the Queue/Requeue TRACS Files in Selected Item process and works the same way whether you are queueing files for the first time or a subsequent time.
You can no longer use the tasks Reject Selected Item or Rebuild TRACS Files in Selected Item if a payment has been applied to this HAP. If you attempt to reject or rebuild such a HAP you will receive this message: There is a Payment Batch associated with this HAP Request and it cannot be rejected.
PIC Transmissions
From the Occupancy Compliance Detail menu, the Public Housing/PIC Web Transmission/ Transmit Files through PIC Website will now bring you to the PIC login web page. Select the correct login choice based on your user authorization.
![]()
USDA Rules do not allow a household's move out effective date to be the first on the month. From the 3560 industry interface rules – ”The date DTM in the move out transmission file -the date is the actual vacate date and cannot be the first of the month. If the household moved out on the first of the month and did not sleep there that night then this date should be the prior day (last day of month)." If you attempt to schedule a moveout in Property Manager for a household receiving RA on the first of the month, you will get the following error message: ”A household receiving RA cannot vacate the unit on the first of the month per USDA RD instructions." If the household receives subsidy from another source or pays the full rent amount, the moveout will be processed for the first of the month, but will be transmitted to USDA with an effective date of the last day of the prior month.
Property Manager is able to determine the correct rent formula to use when calculating the total tenant payment amount for a household that resides in a community where multiple HUD Funding programs exist, such as Section 8 /Section 236. This feature does require that each funding program group has a current rent plan defined on the Community View / Rent Tab. The system will use the correct rent formula in accordance with the HUD Handbook 4350.3 rev 1 section 5-30 Determining Tenant Contribution at Properties with Multiple Forms of Subsidy. The total tenant payment for a household that has been receiving Section 8 subsidy assistance will be based on the Section 8 rent formula. If the household’s total tenant payment is equal to or exceeds the Section 8 contract rent at the time a new Annual or Interim certification is created, the system will then use the HUD 236 Rent formula.
Some reminders about entering Rent Plans
When adding Rent Plans for HUD Section 8 Funding programs, the net contract rent (Gross Rent Less Utility Allowance) should be entered in ”Rent 1” and ”Rent 2” fields.
When adding Rent Plans for the HUD 236 Funding program group, the basic rent should be entered in the ’Rent 1” field. The 236 Market Rent should be entered in ”Rent 2”.
You can rename the generic column heading ’Rent 1’ and ”Rent 2” to match the actual names used by the funding program on the Community View / Rent Tab by selecting the funding program group and changing the labels under Rent Plan Information. For example:
The Rent Plan for the funding program HUD 236 field names for ”Rent 1” and Rent 2 should be re-labeled
Rent1 ”Basic”
Rent 2 ”Note”
Or for USDA, RD funding program group the generic field names for ”Rent 1” and Rent 2 should be re-labeled
Rent 1 ”Basic”
Rent 2 ”Note”
Please refer to your company’s accounting policy and procedure when determining the amounts to enter in the Gross Potential fields.
Annual Recertifications or Interim Recertifications, Scheduled Recertification or Unscheduled Recertifications must be effective the first day of the month. If you enter a date other than the first of the month you will receive the following error message: ”Invalid effective date. For this program group, Annual Certifications and Interim Recertifications must have an effective date that falls on the first day of the month.”
Earned Income Disallowance calculations are now implemented and information for each household member can be maintained on the Household View / Members Tab with a new task Modify EID Information, and through the task Certify Move In. When a 50058 certification is created effective between the EID start date and mature dates it will calculate an income exclusion. If this certification has an exclusion and the 13th or 25th cumulative month would occur prior to the next regular annual Recertification Date, the next Recertification Date will be changed so the household will be reviewed at the end of the disallowance period.
The Moving to Work 50058 form is now available. Customers who have Public Housing funding program groups and should be using this form should go to the Community View / Program Info Tab, select the PHA funding program and update the "PHA Form Option" field that appears under the Funding Program Detail / Rent Calculation section and select 'Moving to work'. This will change the form used on the transaction tab for all households in units of this funding program group.
Passbook Rates are now maintained centrally at Bostonpost for all funding programs for effective dates since 5/1/05. All programs are currently using a passbook rate of 2% to determine imputed income on assets. If you have a need to override the passbook rate for a community, exceptions can be maintained through System Administration / Maintain Lookup Tables / Passbook Rates. The default values show on this window in blue.
System Administration / Accounting Setup: Formerly on the export information setup, the flag to Create Separate GL batch has been moved to the Maintain Lookup Tables Tab under Business Constants because it needs to be set for all communities the same way.
System Administration Menu / Conversion Detail: The task Update Missing Reference Type is now available from the System Administration View / General Tab. This is typically a step you would perform after data was converted from old software with reference types that were not able to be imported through the conversion process.
Household View / Notes Tab: Financial Warning notes were created in version 7.0 on the Note Tab to alert the rental agent that billing was continuing by extending the previous certification that is now out of date. This has been moved to Activity / Notes section on the Household Detail View / General Tab.
Community View / General Tab: Waitlist Review Tasks have been moved from the General Tab to the Waitlist Tab. There are additional tasks for reprinting.
There are two new merge fields available in the data for letters document. You can add these fields to any letters using this data source.
date_of_death_plus_14: Available on a household where the head of household has died.
utility_reimbursement: A positive number that reflects the monthly amount refunded to a household that pays no rent but must pay its own utilities.