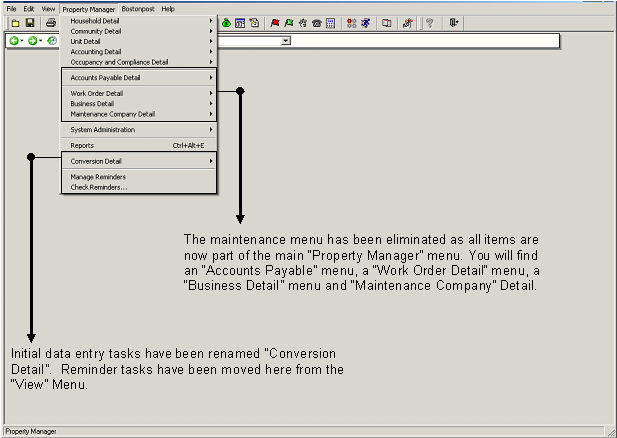
We are excited to share with you the release of Property Manager 7.0. While this release may look very different at first, you will find with time that the navigational changes will make for easier transitions throughout your daily task load. For the most part the tasks and tab screens have remained unchanged, however getting to them may be different with our newly designed Context Bar and Icons. The following will cover all updates within the release.
The menus have been expanded and reorganized. Now you can navigate right to a particular tab in the Household, Unit, Community, Accounting, or System Administration Detail through the menu. There are some items that have been moved or renamed.
Formerly accessed from the context bar, these icons are now available on the toolbar. The context bar will display the heading for the detail provided beneath it. The context bar has become dynamic in that it will be ever-changing throughout navigation.
![]()
Household Detail – Contains Tabs for General Information, Members, Waitlist, Notes, History, References, Income & Expense, Eviction, Transactions, Accounting, Reasonable Accommodations, User Codes, Print Options.
![]()
Community Detail – Contains Tabs for General Information, Program Information, Contract, Rent, Accounting, Waitlist, Manage Vacancies, Unit Turnovers, Notes, Businesses, Maintenance, Building, User Codes and Print Options.
![]()
Unit Detail – Contains Tabs for General, Compliance/Rent/Transaction History, Gross Potential Activity, Maintenance, User Codes and Print Options.
![]()
Accounting Detail – Contains Tabs for General Information, Community Cash Receipts, Subsidy Activity, Payments, Disbursement, General Ledger, Account Maintenance, and A/R Select Receivable.
New Icons
![]()
System Administration – Contains Tabs for General Information, Maintain Documents, Maintain Look-Up Tables, Management Offices, Employees, Define Access, Define Role Members, Accounting Setup, and User Codes.
![]()
Occupancy & Compliance Detail – Contains Tabs for General Information, Applications, Waitlist, Manage Vacancies, Unit turnovers, and TRACS.
![]()
The Context Bar now has navigational buttons (arrows) to move forward and backward through previously viewed screens. There is also a History button that stores a list of previously viewed households, communities, and units in a drop-down list.
The Household drop-down list from the context bar can now be sorted by unit number or last name. It also displays (Household ID) and Unit Number.
![]()
Find Person or Business – This new icon located on the context bar will allow you to search for a person or business, within the household or business context.
New field added to General Information section of the General Tab in the Household View to add an External ID. Enter the data in the field and Save.
![]()
The Find Person Tool has two new fields to search by: External ID or Person ID.
You now have the opportunity to undo a member status change on the Household History Tab. If you had modified the status of a household member, you now have the option to undo the change by highlighting the event and selecting the task.
Depending on the type of modification that was made your Task options might include:
Cancel the Relationship Change
Cancel the Addition of Selected Member
Cancel the Removal of Selected Member
NOTE: This will not adjust any transactions effected by the member change.
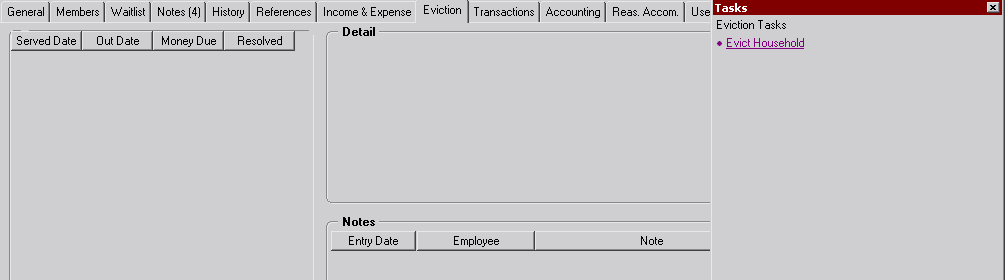
The Eviction Tab is now a fixed tab in the Household Detail. It used to be that to create the Eviction Tab you would complete the Evict Household Task on the Household General Tab. Now the task is available within the Eviction Tab, as this tab exists for ALL households, not only those with eviction history.
A new section was added to the Tasks list on the Household Transaction Tab, entitled "Modify Transmitted HAP Request/Update for TRACS". This section contains new tasks, which are used to make corrections to a transmitted HAP Request at the direction of the CA. There is also a task to correct a transaction for a HAP.
Rebuild Selected Transaction and MAT Record
Select this task to rebuild the selected cert in order to correct non-financial information requested by the CA. A new cert is built and substituted for the old cert in the HAP Request. The task will fail if the new cert results in any financial changes to the HAP Request. After this task, the user can use the Build Single Transmission File task to build and transmit the single transmission file.
Correct Selected Transaction for (Date) HAP
Select this task to add a cert with financial modifications to the latest HAP Request at the direction of the CA. The cert is added to the HAP Request. After this task, the user can use the Build Single Transmission File task to build and transmit the single transmission file, or resend HAP per direction from your CA.
Delete Selected Transaction and MAT Record
Select this task to remove a cert from the HAP Request and Delete it, at the direction of the CA. The cert is removed from the HAP Request, the transmission status of the cert is cleared, and the cert deleted. A new cert may be subsequently created and included with this Hap Request or a different HAP Request.
The Reverse Selected Event task will now present a list of any subsequent events that need to be reversed before reversing the selected event. A "STOP - SUBSEQUENT ACTIVITY ERROR" message will appear in Red. To continue with the reversal, you must first reverse these events, in this order when there is more than one event that needs to be reversed. You will not be allowed to reverse the event, and will get an informational message telling you that the event was not reversed when you click Finished. If no rows are found, we will still attempt to find rows using the old process which looks for any events for the same household, charge type, and due date. If rows are found, a warning message is presented "SUBSEQUENT ACTIVITY WARNING". The following events have occurred since the event that you are trying to reverse, however you can still continue with the reversal.
When making retroactive changes to transactions prior to the Receivables Start Date for the community this household resides in, Property Manager will create "Fabricated" billing/payment events from the effective date of the updated/rebuilt transaction to the Receivable Start Date. Billing corrections will then be created for the difference between the old transaction to the new transaction. The rationale behind this is to be able to create the billing corrections that would not have been created in your old system (whatever you were using prior to Property Manager) because you didn't know about them until you updated the transaction in Property Manager.
For example, John Doe lives in Community A. The Receivable Start Date for Community A was 01/01/2006. A certification on the transactions tab of John Doe's household effective 10/01/2005 was updated on 04/01/2006 (timestamp of the change) increasing the rent from $100 to $150.
For the period from 10/01/2005 (effective date of certification changed) to 12/31/2005 (day before the Receivable Start Date), Property Manager will create Fabricated Billings for $100 to charge the old rent and also create fabricated payments to offset the fabricated billings. No GL Entries are created to be processed to your general ledger and the running balance of event history is not impacted. Then Billing Corrections for $50 will be created for the increase in rent due to the updated/rebuilt transaction which will create open items and GL Entries to be passed to your general ledger.
For the period from 01/01/2006 (Receivable Start Date) to 04/01/2006 (date the transaction was updated) the system will just create the $50 Billing Corrections because the original billings were already recorded for the "live" community.
The assumption is that for months prior to the Receivable Start Date, you have not recorded the billing corrections to your general ledger for this change that was just made. If you have, you can process the GL Batch for these adjustments as "No Export" so that the entries are not passed over to your general ledger.
User Codes will allow you to create customized fields for storing information, for example if you wanted to track license plates for tenant vehicles.
User Codes are set up on the User Codes Tab in System Administration. You can then enter and store data on the User Code Tab in the Household, Community, and Unit views. In the Tasks list select Add a New User Code. You will be able to select the code from a drop-down list of codes that were created in System Administration, and enter a value.
NOTE: Each Tab Container holds its own list of codes. For example, a code that you entered in the household view will not appear in the community view.
The Rent Change Parameters have been simplified. You can now only select one option; with the exception of Change on Next Renewal and Next Turnover, these two rules can be selected together. These settings are still maintained within System Administration Look-Up Tables.
Agency Controls Rent:This option is used when the agency dictates all rent changes. Selecting this option will remove two tasks that are available otherwise:
Rent Change - Add New, available on the Household General Tab.
Modify Unit Rent, available on the Unit General Tab.
Rent Changes on Selected Date: This will create a Gross Potential change on the date selected and a Rent Change for the first of the month following the 30 day notice period. This method is used to change all units in a community together.
Rent Change on Next Renewal (Annual Recertification) and/or Next Turnover: These options can be used together or separately to make updates as households are renewed or new households move-in. The Gross Potential will be updated on the date you create the Rent Change (present day).
![]()
The Waitlist Tab was created from the waitlist icon, which still exists, and will bring you to this tab. Users have the option to select any authorized community from the context bar to display the waitlist. There are tasks available to Add, Modify, or Delete a Waitlist Note/Activity, This tab is also available in the Occupancy and Compliance view.
The Manage Vacancies Tab was created from the manage vacancies icon, which still exists, and will bring you to this tab. Users have the option to select any authorized community from the context bar to display the waitlist. This tab is also available in the Occupancy and Compliance view.
The Unit Turnovers Tab was created from the unit turnovers icon, which still exist, and will bring you to this tab. There are no longer two views, both Maintenance and Rental share the same view. This tab is also available in the Occupancy and Compliance view.
This is a newly titled tab that actually holds three former tabs that are now merged together: Maintenance Definition, Maintenance History, and Fixed Assets.
User Codes will allow you to create customized fields for storing information, for example if you wanted to track VIN Numbers for Maintenance Vehicles for each community.
User Codes are set up on the User Codes Tab in System Administration. You can then enter and store data on the User Code Tab in the Household, Community, and Unit views. In the Tasks list select Add a New User Code. You will be able to select the code from a drop-down list of codes that were created in System Administration, and enter a value.
NOTE: Each Tab Container holds its own list of codes. For example, a code that you entered in the community view will not appear in the unit view.
This data has moved to the Look Up Code Table, as well as Community General Tab.
This information is now available as a pop-up on the Waitlist Tab and Manage Vacancies Tab.
Adjustments to vacancy will no longer show on the household event history. On the Unit Gross Potential Activity tab you can see the adjustments to vacancy at the time of turnover. You can see the whole picture of the former tenant and new tenant adjustments to vacancy, as well as any vacant billing and/or gross rent changes in between.
If the move-out is effective on April 18th, the actual move-out event in event history and accounting will be dated April 19th. This is because the household occupied the unit on the 18th and is responsible for rent on that date. The first date of vacancy is the date the credit to tenant/subsidy receivables will occur as well as adjustments to vacancy. This is consistent with unit transfer processing where all activity is dated on the move-in date into the new unit. This is a change for those who process GL daily. You will see the activity on event history right away, but it will not appear in Pending GL Entries until the day after the cert effective date, that is, the first day the unit is vacant.
This is a newly titled tab that actually holds three former tabs that are now merged together: Maintenance Definition, Maintenance History, and Fixed Assets.
User Codes will allow you to create customized fields for storing information, for example if you wanted to track VIN Numbers for Maintenance Vehicles for each community.
User Codes are set up on the User Codes Tab in System Administration. You can then enter and store data on the User Code Tab in the Household, Community, and Unit views. In the Tasks list select Add a New User Code. You will be able to select the code from a drop-down list of codes that were created in System Administration, and enter a value.
NOTE: Each Tab Container holds its own list of codes. For example, a code that you entered in the unit not appear in the household view.
Process 236 Overage
There is a new task for processing 236 overage each month. This task will allow you to process the overage that you collected and generate the HUD-93104 Monthly report of Excess Income. It will also allow you to indicate the amount retained for HUD-approved purposes.
Change Non-Certified Schedules
There is a new task available, that is also available in the Community view Accounting Tab. This task is designed to allow users to modify existing scheduled billing items that are not tied to a certified transaction, i.e. scheduled items other than Rent or Subsidy. By default, all households with the selected scheduled billing item will be selected for the change, however users have the ability to Select All, Deselect All, or select individual schedules for processing. Selected scheduled items will be terminated one day prior to the new effective date that the user entered, and a new scheduled item will be created for the new amount, starting on the effective date.
When you first navigate to the General Ledger tab in the Accounting Detail, the first change you should notice is the addition of a column in the list of GL Batches detailing that GL Batch’s GL Report Month. Having this new column in addition to the Effective Date column, it is now clear as to what the Effective Date of GL Batch is and what GL Report Month the GL Batch is created in. All GL Batches, including Adjustment Batches are now broken down by their GL Report Month. So when you need to make the decision, ”Do I post this GL Batch into the current period or post it to a prior period?” you have date information right in front of you to help you make that decision.
We have streamlined the processing and posting logic with regard to the GL Report Date. As always, all billings, billing adjustments, payments, etc. created in Property Manager will create Pending GL Entries which are grouped into GL Batches. When an Event/GL Entry is created, it has two dates that are important for reporting purposes: an Effective Date and a GL Report Date. The Effective Date is when this Event/GL Entry should have occurred. For example, a billing correction to adjust rent for April 2006 has an Event Date of 04/01/2006. The GL Report Date of the Event/GL Entry is defined as the later of the date you entered/created the event or the effective date of the event.
If we created the billing correction that was effective 04/01/2006 on 05/01/2006, the GL Report Date of that Event/GL Entry will be 05/01/2006. In almost all cases, the GL Report Date will be the entered/created date of the event. There is only one case where the entered/created date of an event is before the effective date and that is the future billing of subsidy. For example, for the HAP Process, a month’s subsidy billing needs to be made at the beginning of the prior month.
When you process the GL Entries for an Event or group of Events to your General Ledger, you need to decide where to post these, either into the current month or change the GL Report Date and post the GL Entries into a prior month. Starting with Release 6, Property Manager required you to set the GL Report Date in the Process Batch task and all entries in the batch were updated with a revised GL Report Date. Version 7 has streamlined the process to prevent the GL Report Date for Events/GL Entries from being changed in error, and to emphasize the impact of changing the GL Report Date when processing GL Batches.
All GL Batches will be separated by GL Report Month so that the GL Entries in each batch can be loaded to the appropriate month in your accounting software. When processing multiple GL Batches together, they must all be in the same GL Report Month but they can have effective dates in different months. If they are not you will get an ”Invalid Selection” error.
The General Tab is newly created and displays pending Move-Ins, Move-Outs, and Transfers, as well as Pending Approvals. The top portion of the tab displays Pending Activities such as Move-Ins, Move-Outs, and Transfers, that have not yet been confirmed. These reminders will be created automatically in the system through the task wizard process. Once the task is completed (confirmed) the reminder will no longer appear in ”Pending Activity.” The bottom portion of the tab displays Overrides Awaiting Approval. This information used to be accessed from the pencil and paper icon which no longer exists.
![]()
The Application icon is no longer the Send Application task but it is a link to the Application Tab in the Occupancy & Compliance detail. The Application Tab allows users to search for households with the status of: App Sent, Waiting, Scheduled, Removed, or Rejected for a set period of time. The Send Application task is now available within this tab, and remains unchanged, except that when you complete the task you will now be returned to this tab. There are other tasks available in this tab as well.
![]()
The Waitlist Tab was created from the waitlist icon, which still exists, and will bring you to this tab. Users have the option to select any authorized community from the context bar to display the waitlist. There are tasks available to Add, Modify, or Delete a Waitlist Note/Activity, This tab is also available in the Community view.
The Manage Vacancies Tab was created from the manage vacancies icon, which still exists, and will bring you to this tab. Users have the option to select any authorized community from the context bar to display the waitlist. This tab is also available in the Community view.
The Unit Turnovers Tab was created from the unit turnovers icon, which still exists, and will bring you to this tab. There are no longer two views, both Maintenance and Rental share the same view. This tab is also available in the Community view.
The TRACS tab was moved into Occupancy and Compliance view to replace HUD Processing, formerly available on the menu. There are four sub-tabs within the TRACS Tab: General, Special Claims, Misc. Adjustments, and HAP Requests . Eventually there will be additional tabs for MINC and PIC.
Two new Columns were added: ”Adjusted By” and ”Adjusted Amount”. There is also ”Detail” link for a Processed Payment Detail Pop-Up.
A new task, Reject Selected Item was added to the task list for the TRACS HAP Requests tab. This task allows the user to permanently reject a HAP Request at the direction of the CA. The rejection process is permanent and cannot be reversed. A record is kept of the rejection and the transmitted files are preserved, but the forms cannot be reprinted, and the re-transmission status of the transactions is reset.
You are now able to Log Receipt of Special Claim when Entire Claim is denied. The validation has been modified, so that ”Payment Method” and ”HUD Claim ID” are not required fields, when the claim is denied in full.
The General Tab now displays a summary for each community.
![]() .
.
The Maintain Businesses task has been removed and updated on the business icon. It used to be that you would maintain your business information on the System Administration Task menu.
The data fields within the business tab have been ”unlocked” so data can be entered directly in the screen when you view businesses from the phone icon. You no longer need to go to System Administration.
Users can now create customized fields for storing information. For example, if you want to track VIN Numbers for Maintenance Vehicles for each community you could create the User Code in System Administration, and then add the codes in Household, Unit, or Community views.
Filter By - <All>, Community, District, Management Office, Region, Rental Agent
Filter Item - <All ..> or Selected Item
GL By Date - Effective Date or GL Report Date
Date Selection
Column Definitions
Property - Community Name
Tenant Delinquency - All tenant balances excluding Unapplied Payments, Prepaids and Credit -
Refunded Deposit Tent Prepaid - Unapplied Payments, Prepaids and Credit - Refunded Deposit balances only Tenant Total - sum of prior 2 columns (all tenant balances)
Subsidy Delinquency - All subsidy balances excluding Unapplied Subsidy
Subsidy Prepaid - Unapplied Subsidy balances only Subsidy
Total - sum of prior 2 columns (all subsidy balances)
Comments - for the user to enter their own comments manually after running the report
For the public housing agencies the MTW 50058 for Public Housing Agencies has been updated and will now appear on the Household Transactions Tab and print through the wizard.
<rental_agent> added to the Merge Fields for Waitlist Review Document
<fha_eh_non_ins> added FHA Number to the Data for Letters Document