We are pleased to announce the latest release of Property Manager version 7.2. There are some changes that have been made to Property Manager and this document will highlight each of them. When you are prompted to download the upgrade, it is possible that you will receive the following warning:
![]()
Click the warning and choose "Install" to update your ActiveX control and then you can continue with the upgrade.
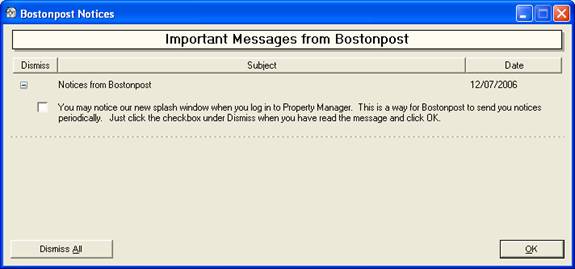
Property Manager has a new notice window with messages from Bostonpost. We may use this periodically to send notices about upgrades, regulatory changes, or scheduled outages, for example. Just click the checkbox under Dismiss when you have read the message and click OK and you will no longer receive that message.
Swap Counted Group -This task has been available to allow a household’s counted group to be changed from one funding program group to another. This task wizard has been enhanced to allow for additional changes to be made to a household’s composition, income, asset, expense and voucher information at the same time a household is swapping to another funding program group.
This task wizard now contains the household member tab window. This allows for each household member’s information to be changed as necessary. The fields that are required for the new funding program group will be marked with *. As you update each member’s information the small circle before each member’s name will turn green showing they have been confirmed.
This task wizard also contains the household’s income and expense tab to allow for the household’s new verified income, asset, and expense information to be updated.
This task wizard also contains the create certification tab. This allows for additional funding program specific details pertaining to the new funding program group to be entered as well as adding voucher information and overriding rents where appropriate. Below are examples of funding program specific details that may be entered.
For HUD exception codes and minimum rent hardship code may be specified.
For USDA indicate if the household has any exempt income.
For Tax Credit set the student explanation code when applicable
The ability to override the rent when the new funding program allows for rent overrides.
The ability to modify or add voucher information when the new funding program allows outside vouchers to be used
Property Manager now has a place to record a household member’s Public Housing Alternate Identifier number (AID) that has been assigned by HUD for Public Housing tenants that do not have a social security number.
Please remember that the AID number must be obtained for a household member that does not have social security number prior to submitting the electronic tenant certification transmission file through the Public and Indian Housing Information Center (PIC).
New Gross income Worksheet
A new report is available from the Household Detail -> Income & Expense Tab and certification wizards. This report is a worksheet of only the income related items for the household and excludes any expense information or adjusted income information. This report is useful for funding programs that do not certify household expenses, such as Tax Credit. The Gross Income Worksheet has been added to all document groups that appear on the tab at the end of wizards where you already see the Income and Expense Worksheet report, such as Annual Recertification or Move-in Household.
By default the Gross Income Worksheet is unchecked so it will not print. To enable it to print by default, go to System Administration -> Maintain Documents Tab. Select the Maintain Document Groups radio button. From the list on the left, select a document group such as ”Move-in Household: Certify Move-in”. Review the Group Contents on the lower right hand section of the window, and check the ”Default On” box for Gross Income Worksheet if you want this report to print by default in the Certify Move-in wizard. For more help on maintaining document groups, visit our website at http://training.bostonpost.com and choose Training Workbooks/Document Administration.
To access the Gross Income Worksheet report at any time, go to the Household Detail -> Income & Expense Tab and right mouse click to Preview or Print the Gross Income Worksheet.
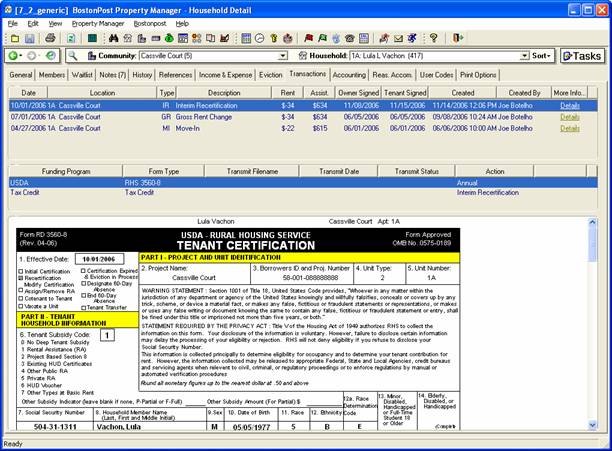
Additional information on the Transactions tab:
On the right hand side of the list of transactions, the date and timestamp and user will now show the information about when the transaction was created. To see when a transaction was last updated, click on the word Details in the right-most column.
Delete Pending Payment - For Tenant Payments received at the household level, you now have the ability to delete them before they are processed in a Payment Batch.
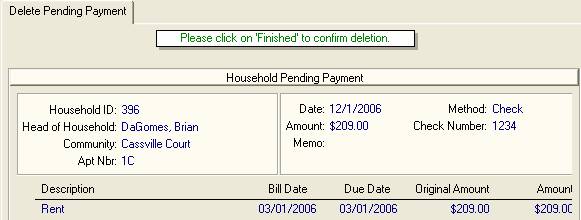
If a pending payment is pulled into a Payment Batch that has not yet been processed. Deleting the pending payment here, will delete the payment from the Batch it was included in.
Applying Credits Across Communities
The Business Constants lookup table (Property Manager -> System Administration -> Maintain Lookup Tables, select Business Constants) has a new checkbox "Allow due To/From processing". This will default to being checked on for all customers, and when it is checked on, users will continue to be allowed to apply credits across communities. Those customers that want to disallow this type of transaction should uncheck this checkbox. If the user then tries to apply credits for a household that has lived in more than one community and has positive and negative open items in different communities, a message will pop-up "Applying credits between communities is not enabled", and credits will not be applied.
Add New Scheduled Receivable - When adding new scheduled receivables for tenants, you no longer need to enter a Next Date. Just enter the Payment Start Date and Property Manager will determine the Next Date to bill once the task is finished. The Payment Start Date can be any day of the month, and the Next Date will always be set to the first of the following month. If the Payment Start Date is not the first of the month, the Initial Payment amount, or the first payment in the schedule (if a different initial payment amount is not specified) will be billed on the Start Date.
Apply Credits Task - When applying credits for Subsidy open items, the first tab in the wizard will now show a list of funding programs and/or voucher sources for the user to select from before applying credits. If you choose a funding program, all subsidy that is in a community funding program group that is funded by that funding program will be available in the apply credits step. If you choose a voucher source, all subsidy open items that have that voucher source will be available in the apply credits step. This will improve the times when credits need to be applied to outstanding items for a tenant with a voucher that has been enrolled in a new funding program group yet the subsidy remains from the same voucher source.
The list of Deposit Scheduled Items now displays the Initial Payment amount so that you get a better picture of how the schedule will bill and has billed.
Add New Deposit - When adding a New Deposit on the Deposits tab we have added validation to help guide you in setup:
When adding new deposits, you no longer need to enter a Next Date. Just enter the Payment Start Date and Property Manager will determine the Next Date to bill once the task is finished.
The Payment Start Date can be any day of the month, and the Next Date will always set to the first of the following month. If the Payment Start Date is not the first of the month, the Initial Payment amount, or the first payment in the schedule (if a different initial payment amount is not specified) will be billed on the Start Date.
If frequency is set to ”Once”, the Payment Amount must equal the Total Due and no Initial Payment Amount can be entered.
If frequency is not set to ”Once” (instead set to monthly, for example), the Payment Amount must be less than Total Due.
Also, the Payment Amount plus the Initial Payment Amount must be less than or equal to the Total Due.
A note has been added to the window to better explain how the Initial Payment Amount is intended to work.
Maintain Selected Deposit - When maintaining an existing Deposit, you no longer have the ability to change the Payment Start Date. If this date is wrong, you need to delete the existing deposit schedule (which can only be done if there are no open items for the deposit and no payments applied to the deposit) and add a new one with the correct date.
Also, if you maintain a Deposit schedule and change the payment amount, you will get the warning ”Changing the payment amount will generate billing corrections from the start date of schedule forward. Are you sure you wish to change the payment amount?”, and then you will be given the option to continue or cancel the task.
A Note about schedules:
Whenever a schedule is maintained, or the Rebill Household task is used, Property Manager compares the expected activity as defined in the schedule with what has been recorded in Event History. If you modify a Pet Deposit payment amount from $10 to $25 and three months have already been billed, Property Manager will generate billing corrections for $15 for each of those three months to reflect what you have now described should have happened.
Add New Promissory Note - When adding a new promissory note we have added validations to prevent the user from creating schedules that do not make sense:
When adding new promissory notes, you no longer need to enter a Next Date. Just enter the Payment Start Date and Property Manager will determine the Next Date to bill once the task is finished.
The Payment Start Date can be any day of the month, and the Next Date will always set to the first of the following month.
If frequency is set to ”Once”, the Payment Amount must equal the Total Due.
If frequency is not set to ”Once” (instead set to monthly, for example), the Payment Amount must be less than Total Due.
Assign Accountant or Asset Manager
Two new fields have been added to each community to assist with grouping communities for reporting. On the Community Detail -> General Tab you can now assign one employee as the Accountant and one employee as the Asset Manager. To get employees to show in the drop down list of choices for Accountant, go to System Administration -> Employees Tab for each employee and in the box of Employee flags, check the box ”Accounting department”. A similar checkbox exists to identify an employee as an Asset Manager. Report data can now be filtered by Asset Manager or by Accountant to report on a group of communities.
No change in 7.2
Late Charges – Ability to charge $1 per day after initial fixed charge to a Maximum Charge
HUD allows for a fixed rate to be charged as a Late Fee after the 5 day grace period and then $1.00 per day for every day after until the payment is made, with a maximum charge of $30. In order to give you the ability to charge late fees in this manner, we have added/changed the following functionality:
Setup steps:
From Property Manager -> System Administration -> Maintain Lookup Tables, select the Late Charge Method table, and make the following changes to the appropriate late charge method or add a new method:
Set the ”Fixed Amount” to what should be initially charged once the prescribed grace period has expired.
Please note that when you are assessing an additional amount per day, the initial charge must be based on a fixed amount, not a percentage of the amount still due.
Set the ”Max Late Fee” amount which is the maximum allowable to be assessed against the tenant.
Set the ”Grace Days” to the allowable period of time the tenant has to make payment before a late charge is assessed
Set the ”Daily Charge” amount to what should be assessed for each day after the grace period expires until the tenant makes payment or the Max Late Fee is reached.
After you have made entries in the ”Fixed Amount”, ”Max Late Fee”, ”Grace Days” and ”Daily Charge” fields, the window will display a message next to the ”Daily Charge” field indicating how late charges will be assessed based on your entries.
Please note that changes to the automatic Late Charge cycle may be necessary, therefore, you will need to contact Bostonpost Support to be sure you are ready to utilize this method. For this method, the late charge will be assessed when either the item is fully paid off, or at the end of the month when the item has not been paid off. Therefore, for this new late charge functionality to work, the assessing of late charges needs to happen automatically with the cycle set to monthly on the last day of the month. Currently, for those customers who have Property Manager potentially assess late charges every night, late charges are assessed against tenants who fail to make sufficient payment as soon as the grace period expires. With the assessment set to the end of the month, if a payment is not received during the month, the late charge will be assessed on the last night of the month for the maximum amount. If a payment was received after the grace period but before the end of the month, the late charge will still be assessed at month end but will be calculated based on the date the outstanding items were paid in full.
What this means is instead of having late charges assessing automatically once they become due, they will be assessed either when a late payment has been paid that pays off outstanding charges full; or at the end of the month when a partial payment was made or no payment was made at all.
Under Property Manager -> System Administration -> Maintain Lookup Tables, select Business Constants, you need to check off a new field called ”Assess Late Charge with Payment Batch” for this new method.
The user can only turn this on if they are already set up to Assess Late Charges on a scheduled basis.
If this is enabled, the late charges relating to items that were paid off in that payment batch will be assessed.
Processing changes:
From Property Manager -> Accounting Detail -> Payments Tab – we have created a new tab in the payment process task, ”Review Late Charges” that is presented after the batch is successfully posted.
Once you process/post the batch in this step, late charges have been assessed based on the Late Charge Method. The tab, ”Adjust Late Charge” is right after the ”Review Payment Batch” tab and is only visible if late charges were assessed on the processing of the payment batch.
So after clicking next to the ”Review Payment Batch” tab and processing the payment batch, this next tab will display a list of those households with their assessed amount, allowing the user to enter a new amount to assess (valid amount must be positive up to the total amount originally assessed).
This process does not allow the user to assess a late charge higher than what is called for by the Late Charge Method.
But you can waive any part of the charge to the lesser amount entered on this screen.
Enter 0 (zero) to waive the entire late charge.
When you click next to this tab, any new amounts will be processed as billing corrections reducing the late charge assessed to the new amount.
IMPORTANT: One further thing to note is that if a tenant anticipates owing a late charge with their payment; leave that portion as unapplied in the payment batch since the late charge is not assessed until the payment batch is processed. Once the payment batch has been processed, the unapplied amount will automatically be applied to the assessed late charge..
It is important to note that the task only reports pending payments for the current day and prior days that haven't already been included in a payment batch (processed or not). As soon as a pending tenant payment is included in a payment batch, it will not be displayed on this report.
This report is intended to be used by users who receive the tenant payments to make sure they still have all the checks and all checks have been entered into Property Manager. The report can then be given to the person or office responsible for creating payment batches and deposits for tracking at that level as well.
Add New Receivables - A new Task has been added to this window listed under Batch Processing for adding new receivables to a group of households in one community or across all your authorized communities. This effectively gives you the ability to add a one time charge to all active households in your portfolio with the click of one button.
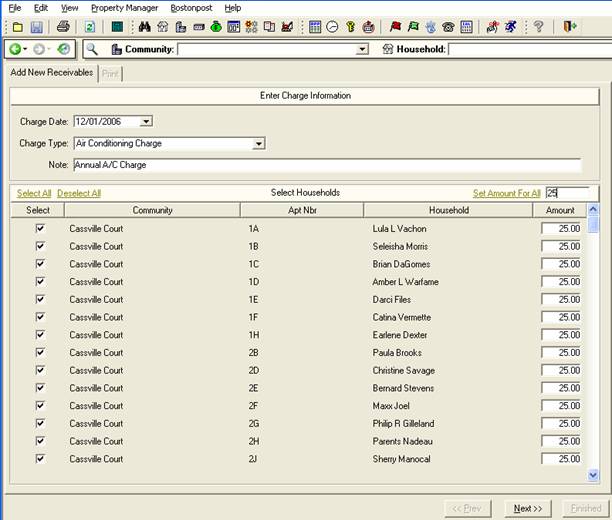
After clicking Next to the above, you will be given the option to print an ”Add Batch Receivable” Report listing households, apt nbrs, due date, charge type and amount just charged. Also, a new GL Batch type has been added to the General Ledger to separate the GL Entries created from running this batch process.
When Creating a Payment Batch, Limit Selection of Households to Default Community
With 7.2, when you create a Payment Batch and select a Default Community in the first step of the ”Start New Payment Batch” task, Adding payments to batch is now restricted to household’s in this community. If ”All Authorized Communities” is selected payments can only be added to household in communities that the user is authorized to see. This is true for unapplied payments, prepaids, adding receivables, and attaching unbatched payments to a batch. You will be able to select the household in the payment batch, but the process will prevent you from adding receivables, unapplied payments, and prepaid payments to the batch. Any open items that are listed for the household that relate to the other community, will not be selectable to receive against in the batch you are in. This will help to prevent a user from adding a payment to a batch outside of the default community selected, as well as adding a payment for a household that is living in a community that the user is not authorized to work in.
If you have a household that is living in a different community now but lived in the community as the default community in the batch and there are open items from both communities for the household, you will be able to receive against open items for the household that relate to the default community and not the community outside of the payment batch.
Including Unbatched Payments in a Tenant Payment Batch
We have added new sorting and ”Find” functionality to this step of the ”Start New Payment Batch” task when receiving tenant payments.
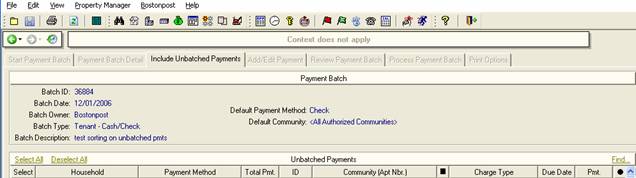
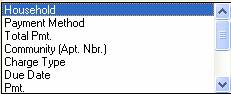
You can now click on each heading in this window to sort by that heading. This gives more ways of sorting the list so that it better matches the stack of checks to be included in the payment batch. We have added a column called ”ID”. As each pending (unbatched) tenant payment is received at the household, it is given a sequential ID. So if you sort by this column heading, the checks should be sorted in the order that they were entered into the system.
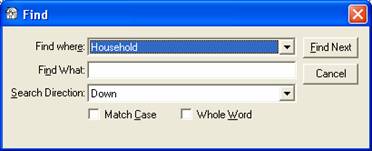
Also added to this window is a ![]() link that will allow you to easily search through a long list of unbatched tenant payments to find the ones that you want to include in the current payment batch.
link that will allow you to easily search through a long list of unbatched tenant payments to find the ones that you want to include in the current payment batch.
Because Property Manager stores the subsidy requested for each unit on a HAP Request, the Process Payment wizard ensures that the check you receive matches the HAP Request. One new change in 7.2 is that you need to enter the amount of the check you are processing. If the check amount you are trying to process does not match the HAP submitted, you will see the error message below.

Before you process the check, make any revisions to your HAP request which have been made by the Contract Administrator or HUD after your initial submission. This way when you receive your payment it will always match the HAP request stored in Property Manager and posting your payment will be effortless!
Pending Activity
”Potential Special Claims” was added as a pending activity type. This type of pending activity will appear when the system detects there is a valid vacancy period for a HUD community and a Special Claim for vacancy has not yet been created.
No change in 7.2
View Work List – View By District
Viewing the Work Order list has a new choice to view work orders By District. Community Districts and Community Regions are ways to group communities for reporting. The lists of Community Districts and Community Regions can be maintained under System Administration -> Maintain Lookup Tables. Use the right mouse click to get options for Insert and Delete. Every Community District must be assigned to a Community Region. Then Community Districts are assigned to each community on the Community View -> General Tab.
No change in 7.2
Creating IOI Invoices
For customers that have an IOI (Identity of Interest) Maintenance Company, the process of creating IOI Invoices has been separated from the exporting of IOI Invoices to your accounting system. In prior versions of Property Manager, this functionality has only worked when your accounting System is QuickBooks. For those customers that use an accounting system other than QuickBooks and Bostonpost Financials, you now have the ability to create IOI Invoices without exporting them to accounting.
From Property Manager -> Maintenance Company Detail Billing –> Create Invoice, you will get a listing of all completed Work Orders broken down by Line Items on the Work Order for the Vendor Selected.
The Vendor drop down list will only include vendors designated as ”In House” under Property Manager, Business Detail.
Select the Work Order Line Items for which you want to create an IOI Invoice and select the task Create IOI AR Invoice.
Work Order Line Items are grouped by Community. If you select Line Items from more than one community, an invoice will be created for each community selected.
Clicking finished to this task will create an IOI Invoice as well as a vendor invoice from the IOI Company to the Community for whom the service was performed.
The other task available from this window is to ”Purge Selected Line Items”.
This allows you to remove Line Items that you do not intend to bill.
For those customers on QuickBooks (and coming soon with the next release of Bostonpost Financials), navigate to Property Manager, Maintenance Company Detail, Billing – Export Invoice to export the invoices that have been created to your accounting system. For those customers on a different accounting system, you can still use this window to review IOI Invoices that have been created with the ability to drill down back into the Work Orders behind each billing.
No change in 7.2
Custom Report Groups – Additional Enhancements
Custom Report Groups that became available with version 7.1 have been enhanced slightly to improve on functionality and ease of use.
For security, we added a sub-menu under Reports, to allow the user to secure the new task Manage Custom Report Groups.
The Tree View (list of reports) has been modified to use the sort order specified for custom reports when they are added to a Custom Report Group. Reports listed under the Standard Report group will continue to sort alphabetically.
In release 7.2 you can add a report into more than one Custom Report Group to allow for more flexibility.
Fixed the Tree View to reposition after the user runs a report. So when you go back to the list of reports to select another report, your last selection will be highlighted, which will insure that you are still in the Report Group that you previously made a selection from instead of at the top of the list of reports.
Filtering Communities on Reports
Two new fields have been added to each community to assist with grouping communities for reporting. On the Community Detail -> General Tab you can now assign one employee as the Accountant and one employee as the Asset Manager. To get employees to show in the drop down list of choices for Accountant, go to the System Administration -> Employees Tab for each employee and in the box of Employee flags, check the box ”Accounting department”. A similar checkbox exists to identify an employee as an Asset Manager.
On the Report view, after you select a report, on the Maintain Report Parameters window, you now have a choice under Filter: to filter the report data by Accountant or by Asset Manager to include data for related communities on the report.
Previous Release Notes for V 7.1